It’s common knowledge among social media marketers that Facebook’s organic reach is tough to get. It involves a hefty strategy of great content and consistency.
In fact, unless you’re continuously engaging your Facebook audience, you may lose credibility and authority. Not to mention a significant decline in reach and brand loyalty. If the concept of maintaining a steady stream of content seems daunting, don’t worry. You can easily learn how to schedule a post on Facebook and maintain a consistent publishing calendar.
Automating your posts will help you streamline your processes to save time and support your content strategy. This makes it easier to effectively carry out your overall Facebook marketing strategy. Your audience never sleeps, and neither should your Facebook content.
Can you schedule a post on Facebook?
Yes, you can set your Facebook posts to automatically go out at the desired time. This allows you to publish your posts at a time when your audience is most likely to engage with them. The Meta Business Suite comes with powerful Facebook scheduling features. You can also use third-party social media scheduling tools to schedule multiple Facebook posts at a time.
How to schedule Facebook posts with Meta Business Suite
Step 1: Start by logging into your Facebook account. Head to your Facebook Page, then switch profiles so you’re managing your Page. In the left-hand sidebar, click on Meta Business Suite.

Step 2: Click on the Planner tab in the main dashboard to see your content calendar. Hover over the date you want to schedule your post and click on the Schedule drop-down menu. Select the option to Schedule post.
Alternatively, click on Create post at the top of the planner. If you choose to go this route, skip right ahead to Step four.

Step 3: Use the pop-up window to select a date and time for your post to go out. If Meta has sufficient audience info, it’ll also suggest Active times to schedule your posts. Then click on Save.

Step 4: Create your post and select which account you want it to publish to. Add your photo or video and input your caption. You can also get a preview of your post on the right-hand panel. Then scroll down to the Scheduling options to confirm or change the date and time to publish your content.
Choose your privacy settings. You can either set it to Public or restrict it to certain people. Then click on Schedule.

That’s it! You now have a scheduled post. Repeat the steps above to schedule additional posts.
How to schedule Facebook posts with Sprout Social
Here’s how to create scheduled Facebook posts with Sprout:
- Click the Compose icon to open the Compose window.
- Click the Profile Picker to select the Facebook pages for your post.
- Create your post.
- Select Specific Days & Times from the When to post dropdown, then choose.
- The date and times for your post.
- Optionally add more scheduled times.
- Click Schedule.

Schedule Facebook posts with the Sprout Queue
What do you do when you have meaningful Facebook content, but don’t need to publish at any specific date or time? Use the Sprout Queue.
You can build your Sprout Queue to fill engagement gaps throughout the day. This lets you mix things up with content around product tips, links to thought leadership articles or industry news.
Choose the number of posts per day, your date and times. And Sprout will do the rest. To set up your Sprout Queue setup, follow these steps:
- Navigate to the Publishing
- Click Sprout Queue.
- Click Compose and create your post.
- Choose Auto-schedule with Sprout Queue from the When to post dropdown.
- Select Queue Next at the first possible time slot or Queue Last to move the post to the end of the queue.
- Click Queue or Submit for Approval to schedule your content.

Configure your queue timeline
Sprout’s suite of social media publishing tools places the content in the Queue Timeline for you to choose a specific time or date. There you can identify your publishing time gaps and plan your content.
You can configure this feature to run during specific times or dates. This makes it simple for social media managers to post during the best times to post on Facebook. Select various post times for each Facebook Page.
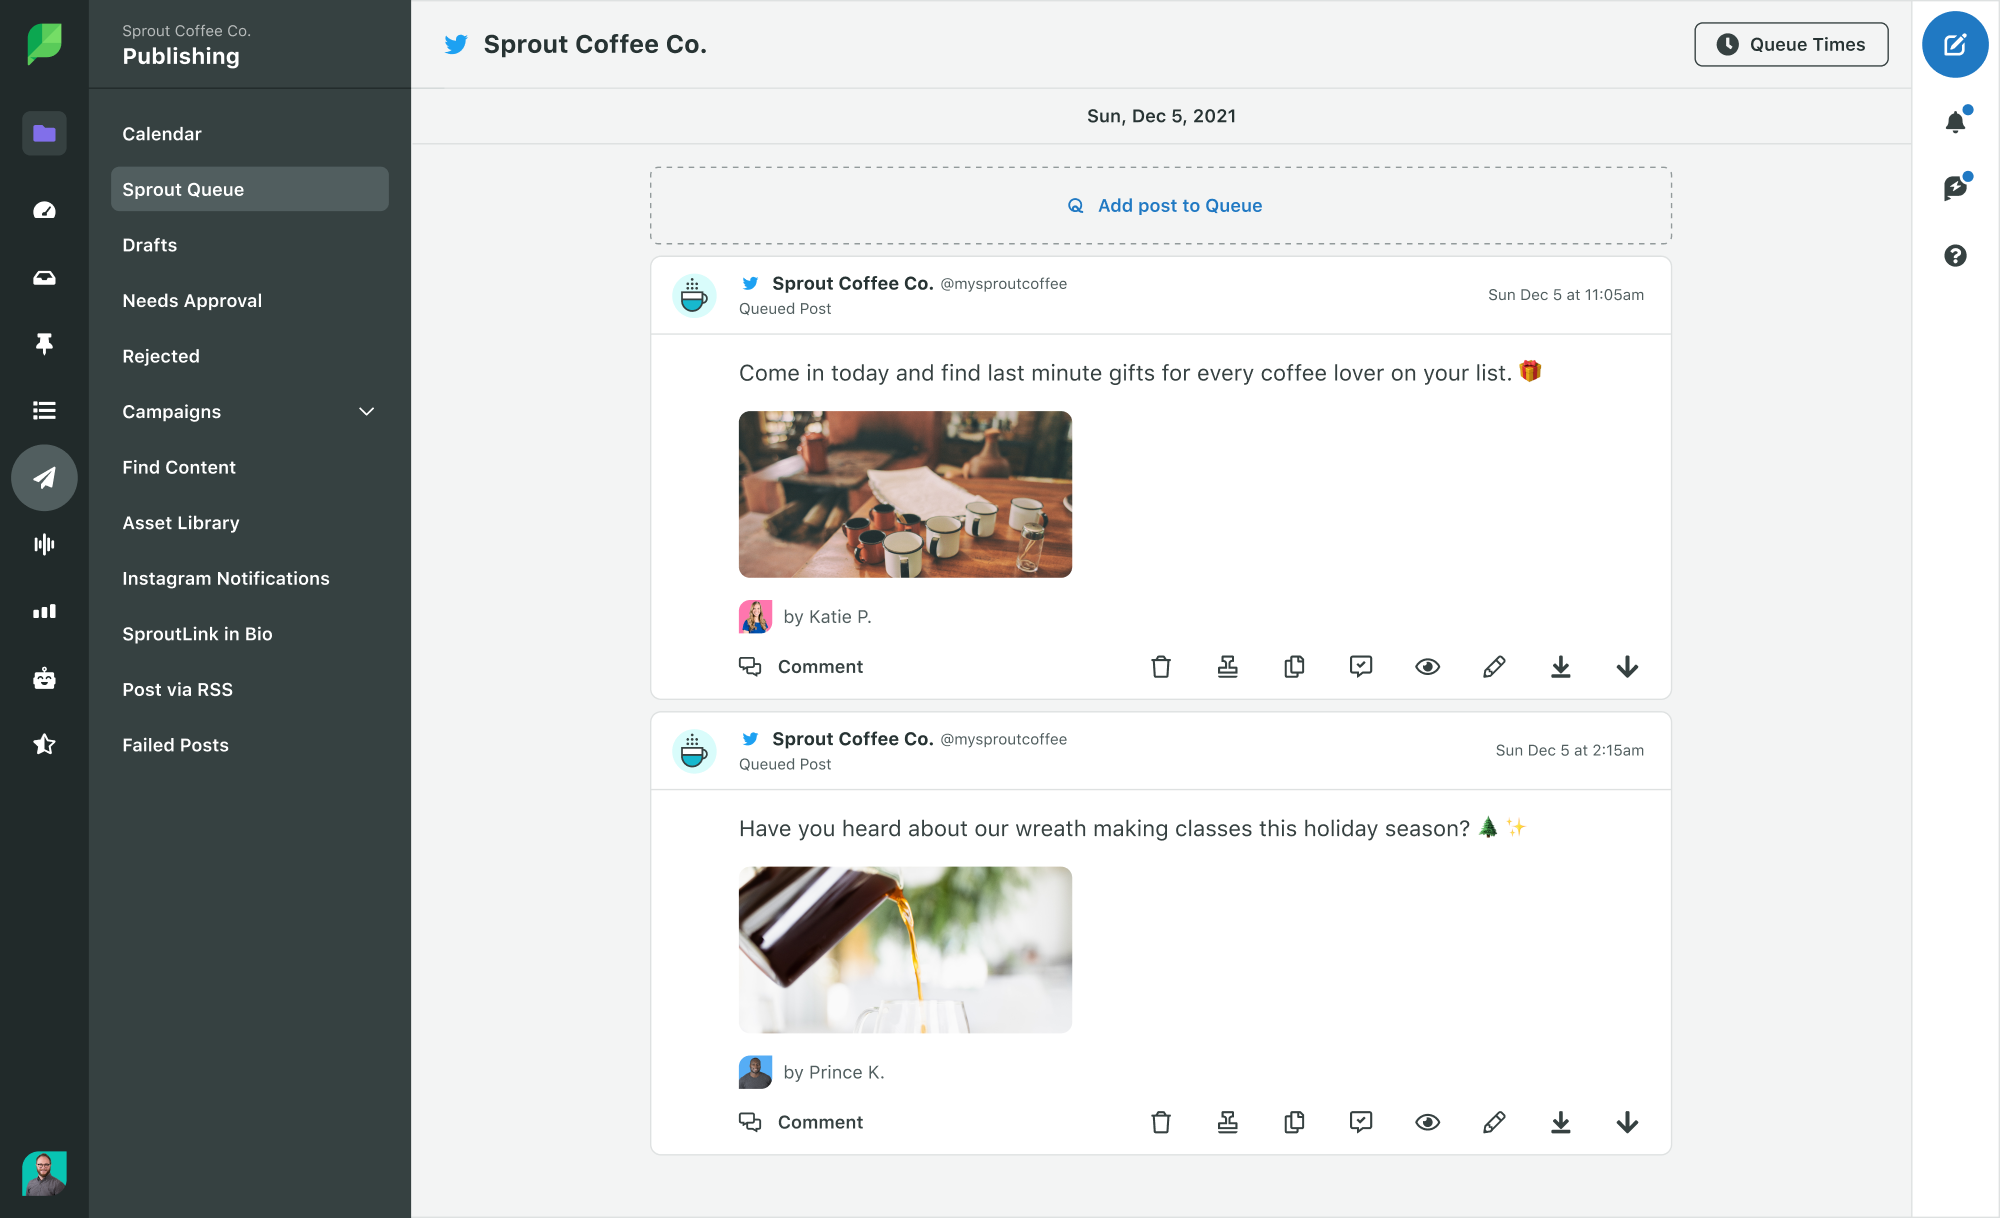
Sprout’s Queue even makes it simple to see your daily post times across all your different social media profiles.
Take advantage of ViralPost
ViralPost is Sprout’s tool for publishing at the most optimal times. Configure ViralPost in your Sprout Queue to publish your queued content at the best times. Note that this option is only available in Standard Plans and above.
When you use ViralPost, it analyzes your audience’s usage and engagement patterns. It then uses those insights to determine the optimal times to publish content on your Facebook page.
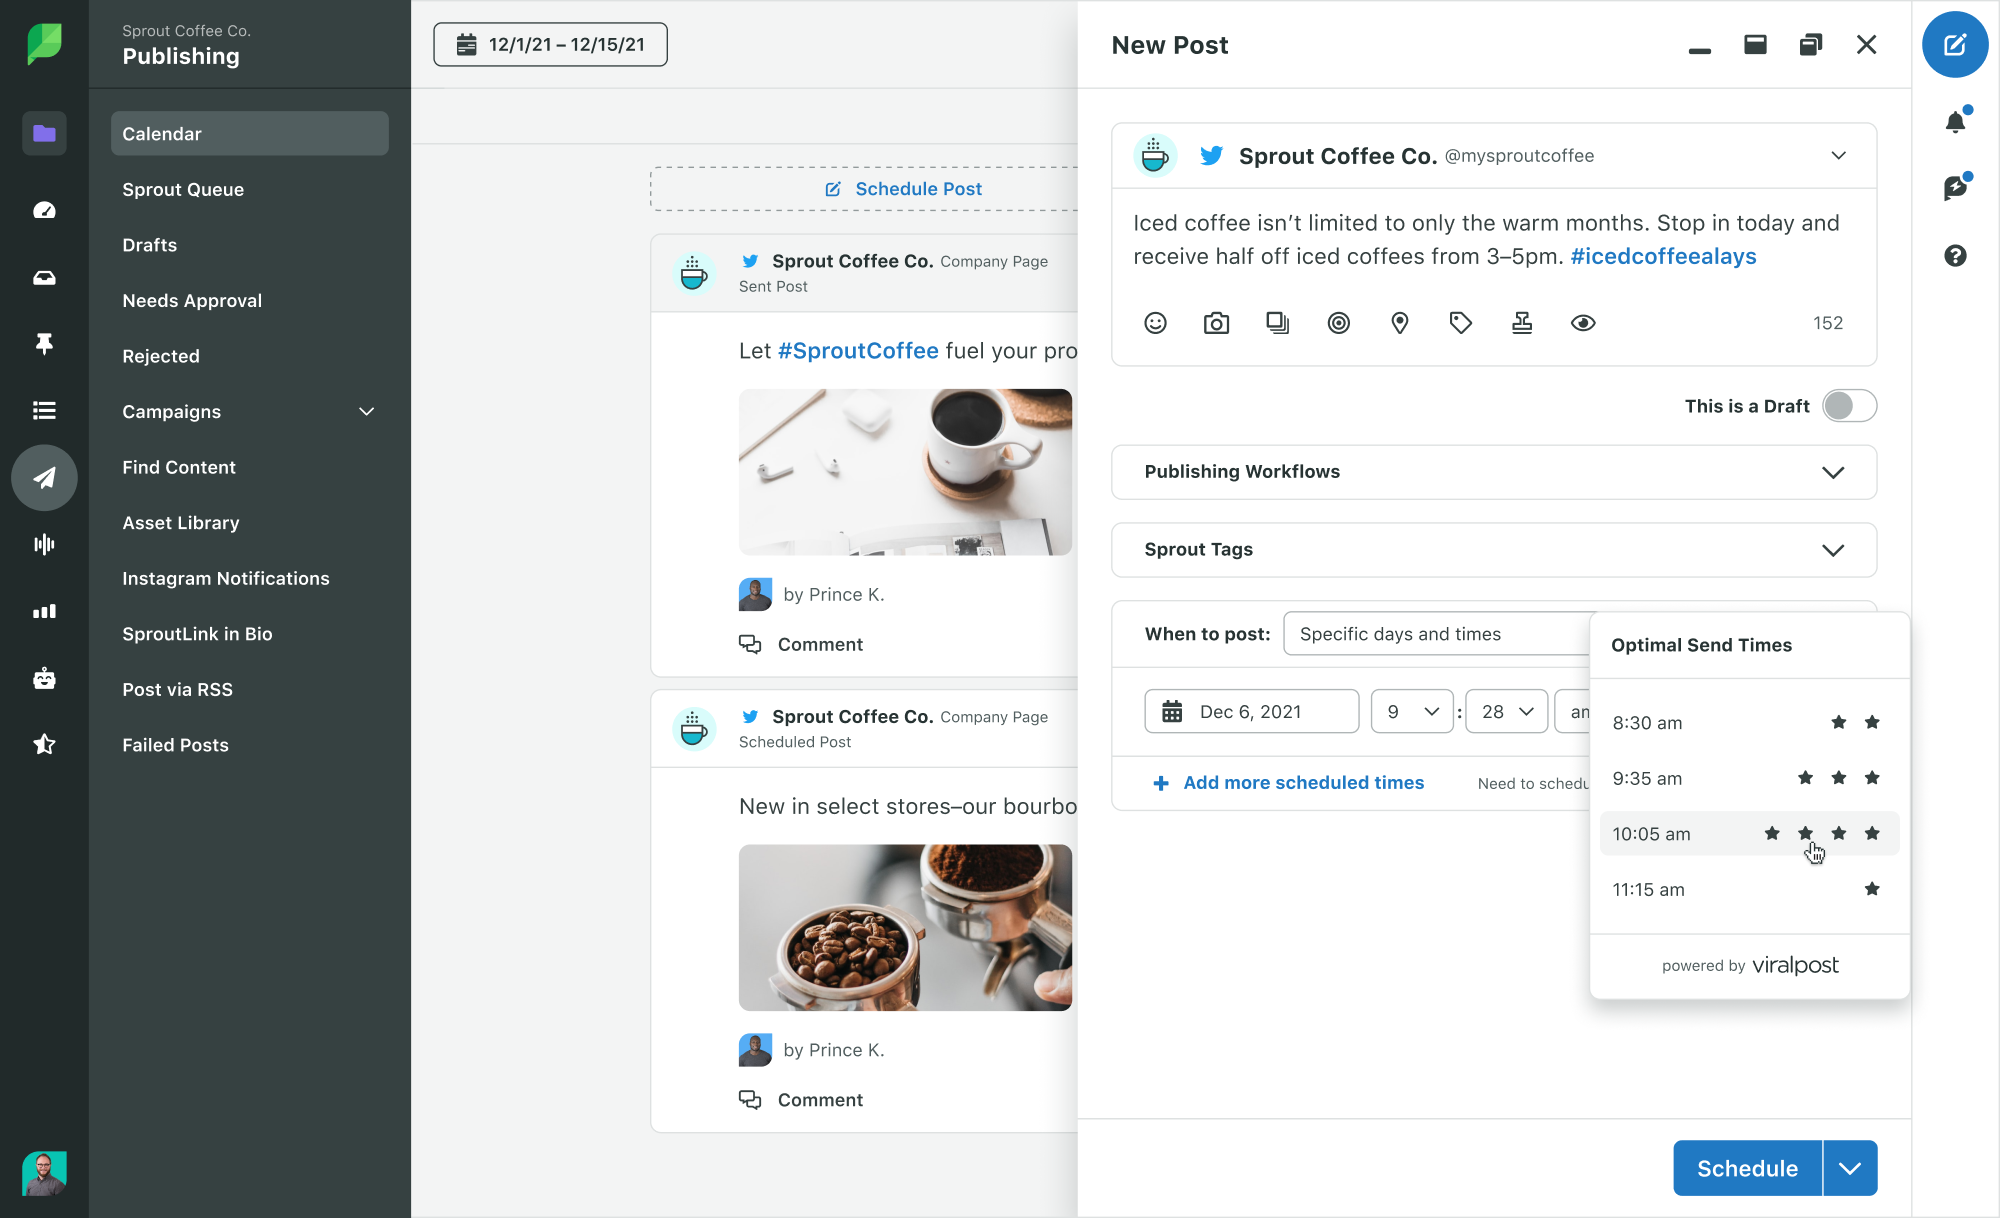
To configure your ViralPost settings, follow these steps:
- Navigate to your Publishing
- Click Sprout Queue.
- Click Edit for the profile you want to configure ViralPost for. The Configure Queue Settings popup opens.
- Select ViralPostfor the Scheduling Method.
- Choose whether you want to set your schedule by Individual Day or Weekdays/Weekends.
- Select the number of times you want to post for each day of the week.
- Select the time range for your post.
- Click Save.
Add Facebook content to the Sprout Queue
It’s always best practice to queue content when it’s top of mind. Draft a message directly from Compose. Or share content you found on the web with Sprout’s Chrome Extension. You can even add content to the queue directly from the RSS Reader. Whichever type of content you wish to publish on your Facebook page, our tools will suit your needs.
Pro Tip: Add content anytime, from anywhere by queueing content from Sprout Social’s web, mobile or browser extension apps.
Share your calendar
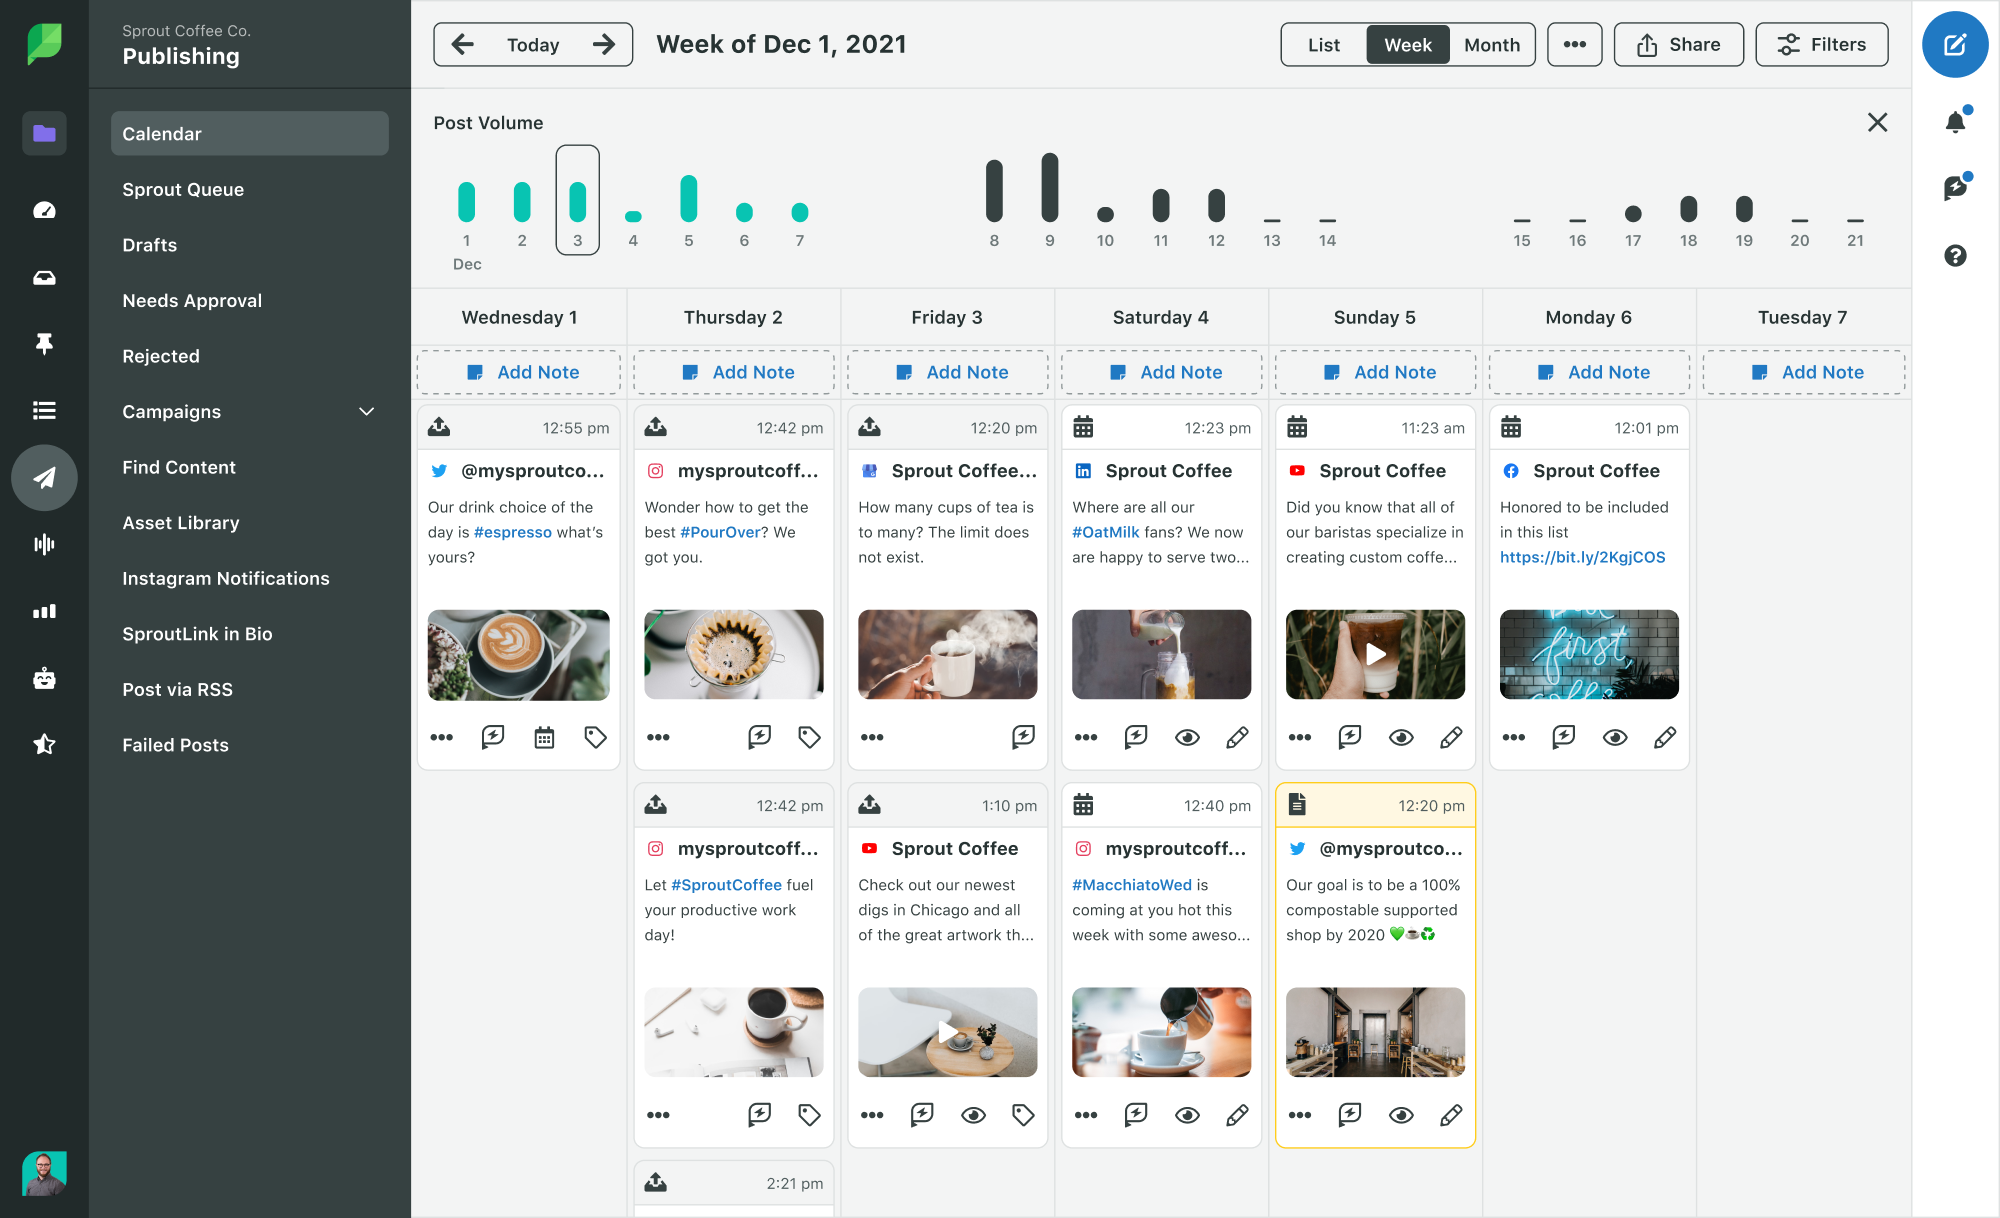
Last but not least, once you have your content in order, easily view, share and collaborate on your content calendar. Sprout’s Publishing Calendar gives you an overview of your social media publishing schedule. You can share this calendar with team members or clients to improve visibility.
Here’s how to view and share your calendar as a PDF:
- Navigate to the Publishing
- Click Calendar.
- Choose List, Week or Month.
- Select your Date Range, Profiles and Content Types.
- ClickShare.
- Click Download PDF.
Best practices for Facebook scheduling
Scheduling your Facebook posts is one thing; ensuring that you reach and engage the right audience is another. Here are five tips on how to strategically schedule Facebook posts for optimal results.
Tips for choosing the right scheduling time
First things first, you need to make sure you’re scheduling your posts for the right time. Making sure you get your content out when your audience is most active is key to reaching the most people.
In the process, you’ll get to boost your Facebook engagement as your content reaches more people.

Global data states that the best times to post on Facebook are:
- Mondays from 9 a.m. to noon
- Tuesdays from 9 a.m. to 2 p.m. and 5 p.m.
- Wednesdays from 9 a.m. to 3 p.m. and 5 p.m.
- Thursdays from 8 a.m. to 2 p.m. and 5 p.m.
- Fridays from 9 a.m. to 11 a.m.
However, you should also pay attention to your specific audience. You can check out your Facebook analytics and see when your followers are most likely to be online. That way, you can schedule your content around those time periods.
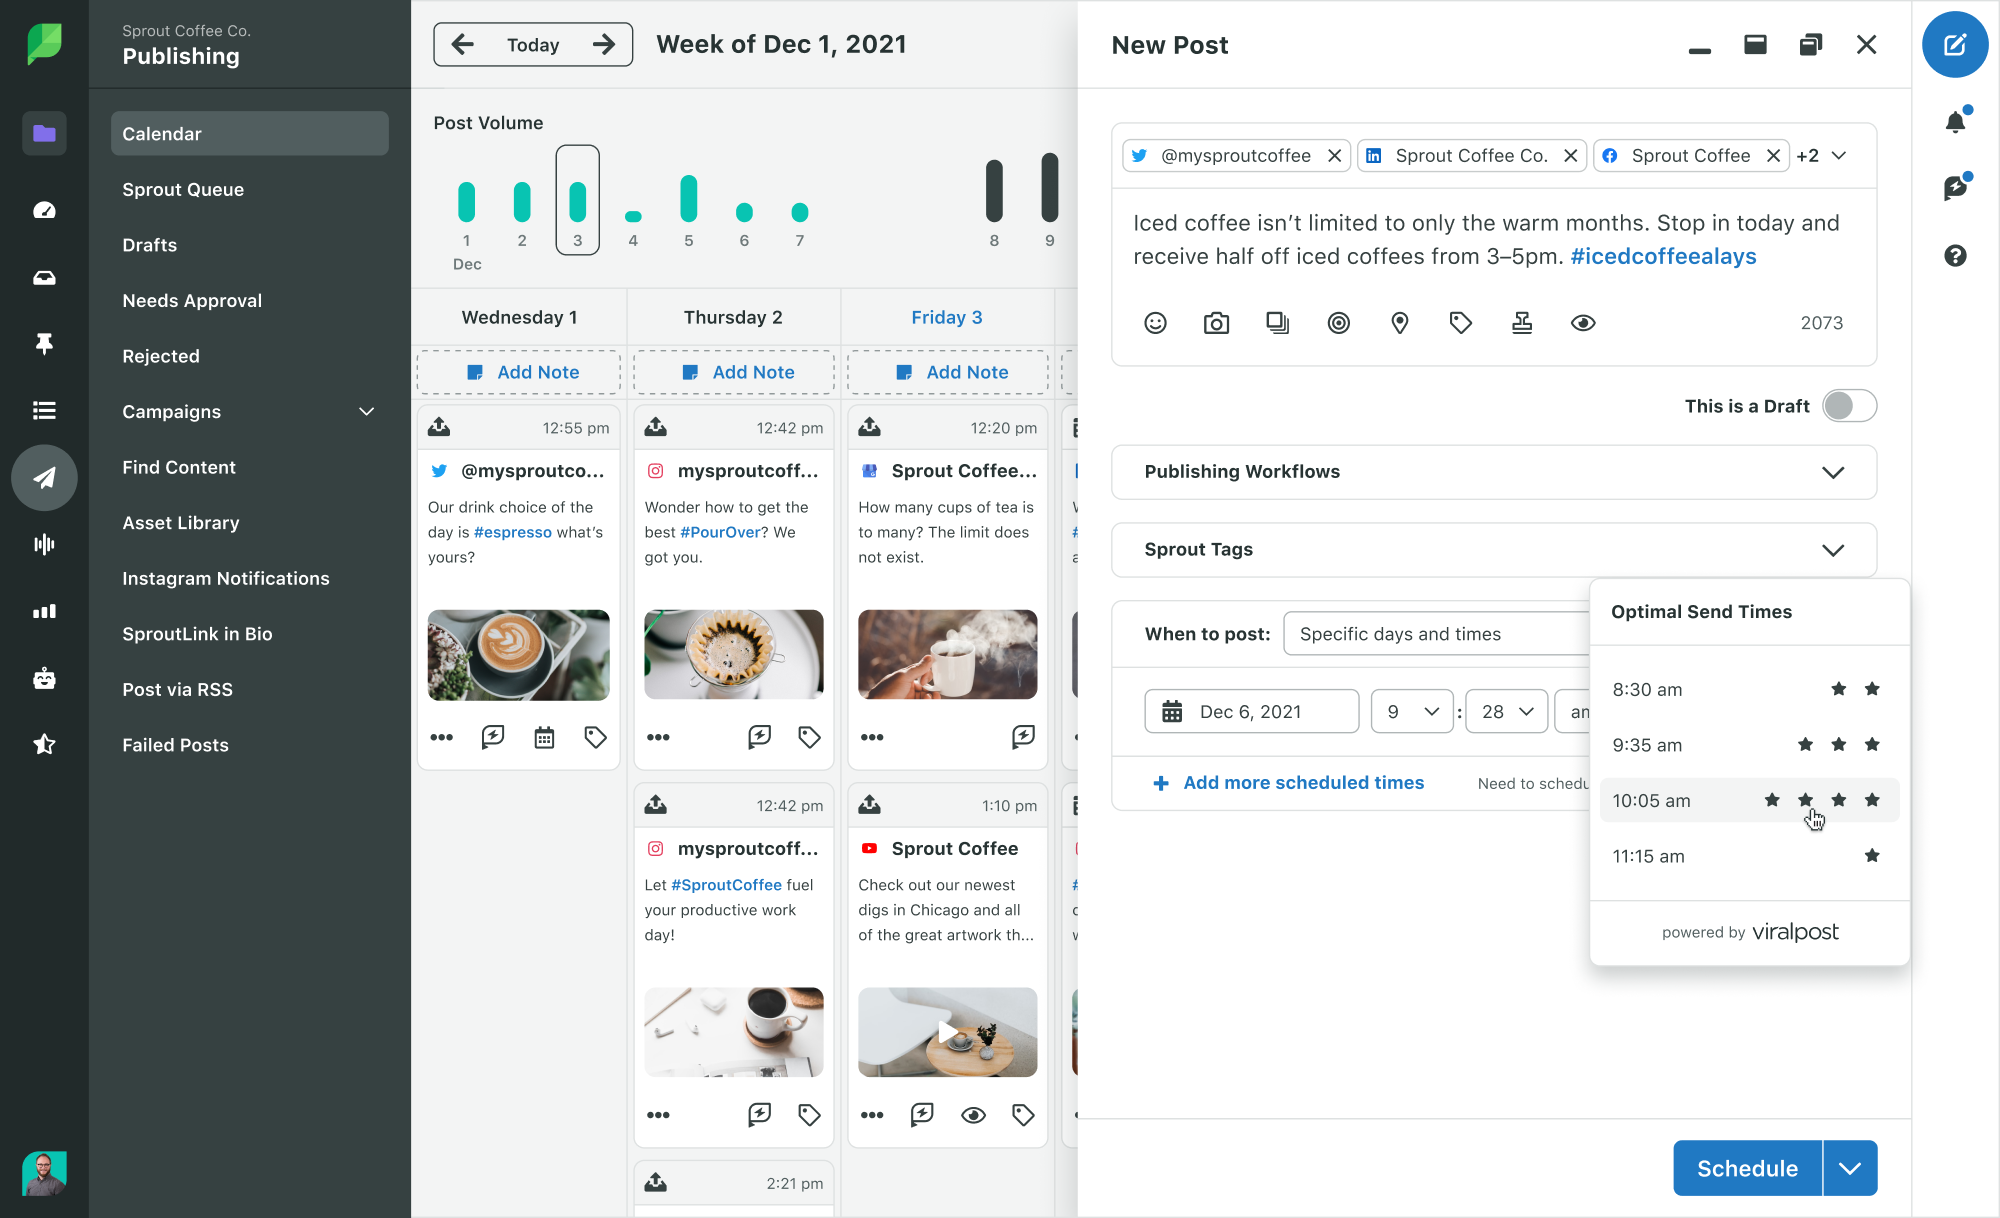
You can also take advantage of Sprout Social’s Optimal Send Times feature. This analyzes your audience and selects the best times to schedule your content.
Maintaining brand consistency in scheduled posts
Next, it’s important to make sure you’re keeping up with your branding throughout all of your scheduled content. If you batch your content creation, this should be a simple enough process.
Maintaining brand consistency includes things like:
- Keeping a similar brand voice throughout all of your captions
- Using the same color scheme and font choices throughout all graphics
- Sticking with the same filters and effects for all videos
- Creating graphics using similar templates so everything looks cohesive
If you’re reaching a wider audience due to your scheduled content, you want to make sure that content is representative of your brand. It should be able to help with overall brand recognition.
Balancing scheduled and live content
Keep in mind that not everything needs to be scheduled ahead of time. Your company might decide to put on a last-minute promotion that you want to share on social media. You might have a stroke of inspiration and want to publish something different from what you had scheduled. Or you might need to share a last-minute company update.
Whatever the case, understand that you don’t have to stick to one extreme or the other—all scheduled content or none of it. You can still make last-minute changes, switch up your content and share live posts when they come to you.
If you do, just make sure you’re not publishing a live post around the same time as a scheduled post is going live. Be sure to readjust your schedule to make room for your new content.
Avoiding over-scheduling
Don’t go crazy scheduling content—there is such thing as too much of a good thing, and you don’t want to end up with 5+ posts each day. Though many brands do post 4-5 times per day on Facebook, you don’t need to over-schedule. This can dry up your well of content ideas more quickly and annoy your audience if they see too much content from your brand.
Instead, come up with a scheduling plan that makes sense for your business, your content creation load and your audience—and stick with it.
Track analytics and engagement
Finally, pay attention to your Facebook analytics and overall audience engagement. Global data and your insights can give you a good idea as to when to start scheduling. Additionally, keeping up with your analytics can show you which types of posts and which days/times garner you the most engagement.
Use this data to inform and adapt your Facebook strategy. This can improve your overall Facebook organic reach, engagement and other important metrics.
Why you should schedule Facebook posts
Scheduling content ahead of time has a number of benefits. Check out the top reasons why Facebook scheduling can be a smart productivity hack.
- Scheduling allows you to post consistently and prove your reliability to social media algorithms.
- When you set aside a block of time to schedule all your social media content, you can effectively boost productivity.
- Saving content creation for one of your more inspired moments helps you create more quality content.
- When you schedule content ahead of time, you can plan it for any time of the day or night. This enables you to properly reach people across several time zones.
- When you’re scheduling social media posts for a full month (or longer), you can make sure they support the narrative you want to convey.
- Publishing your posts consistently at the best times will show Facebook’s algorithm that your page is a hub for regular, quality content. As a result, it’ll put it in front of your audience and drive up your Facebook engagement.
- Facebook scheduling helps you free up time for other important social media management tasks.
Simplify your Facebook post scheduling
Scheduling your Facebook posts makes it simple to manage your content. It streamlines the Facebook management process and minimizes the need for manual publishing.
As such, it allows you to stay one step ahead of the game and reach your target audience at the right times.
Sprout Social’s Publishing capabilities let you automate and optimize your Facebook scheduling. Get started with a free 30-day trial.
Scheduling Facebook posts FAQs
Is there an app to schedule Facebook posts?
Yes, you can use Sprout Social’s Social Media Publishing platform to schedule your Facebook posts. Manually choose the date and time to publish your posts or use the Optimal Send Times feature to determine the best times to post for your brand.
How to schedule posts on Facebook Meta?
To schedule posts on Facebook Meta, go to the Meta Business Suite and click on Planner. Here, you can create a post and choose a date and time in the Scheduling options to schedule it.
How many posts can you schedule in advance on Facebook?
Facebook lets you schedule up to 30 days’ worth of posts in advance. To get around this, you can use Sprout Social’s Social Media Publishing platform to schedule posts several months in advance. You can even schedule hundreds of Facebook posts at a time with it’s bulk importing features.
